Showing posts with label decorations. Show all posts

Monday, August 1, 2011

Farm Birthday Party

Phew!  July was a blur.  Birthdays, weddings, life in general.......it was busy, busy.  Earlier in the month my son celebrated his second birthday {sniff, sniff - he's growing up so fast}.  The party was a farm theme complete with pony rides & a small petting zoo.  The kids LOVED all the animals - the baby pigs were a huge hit!  I loved getting crafty and seeing all my hard work come together just as I had envisioned it - seeing all the happy, smiling kids (especially how happy my son was) was a great bonus!  Here are some pictures of my little man's big day:

I love balloon wreaths! I made one for his first birthday and it turned
out so adorable, I knew I'd be making more.  All you need is a straw wreath form
(still wrapped in plastic), a few large packs of the balloons of your choice
and floral pins. Just stick the balloons to the wreath with your pins and TA-DA!


The gift bags I found online at Oriental Trading.
I stuffed them with farm themed books, puzzles, stickers, pencils, erasers
and activity pads.  All items were purchased at the dollar section of Target, the Dollar Store
or Oriental Trading.


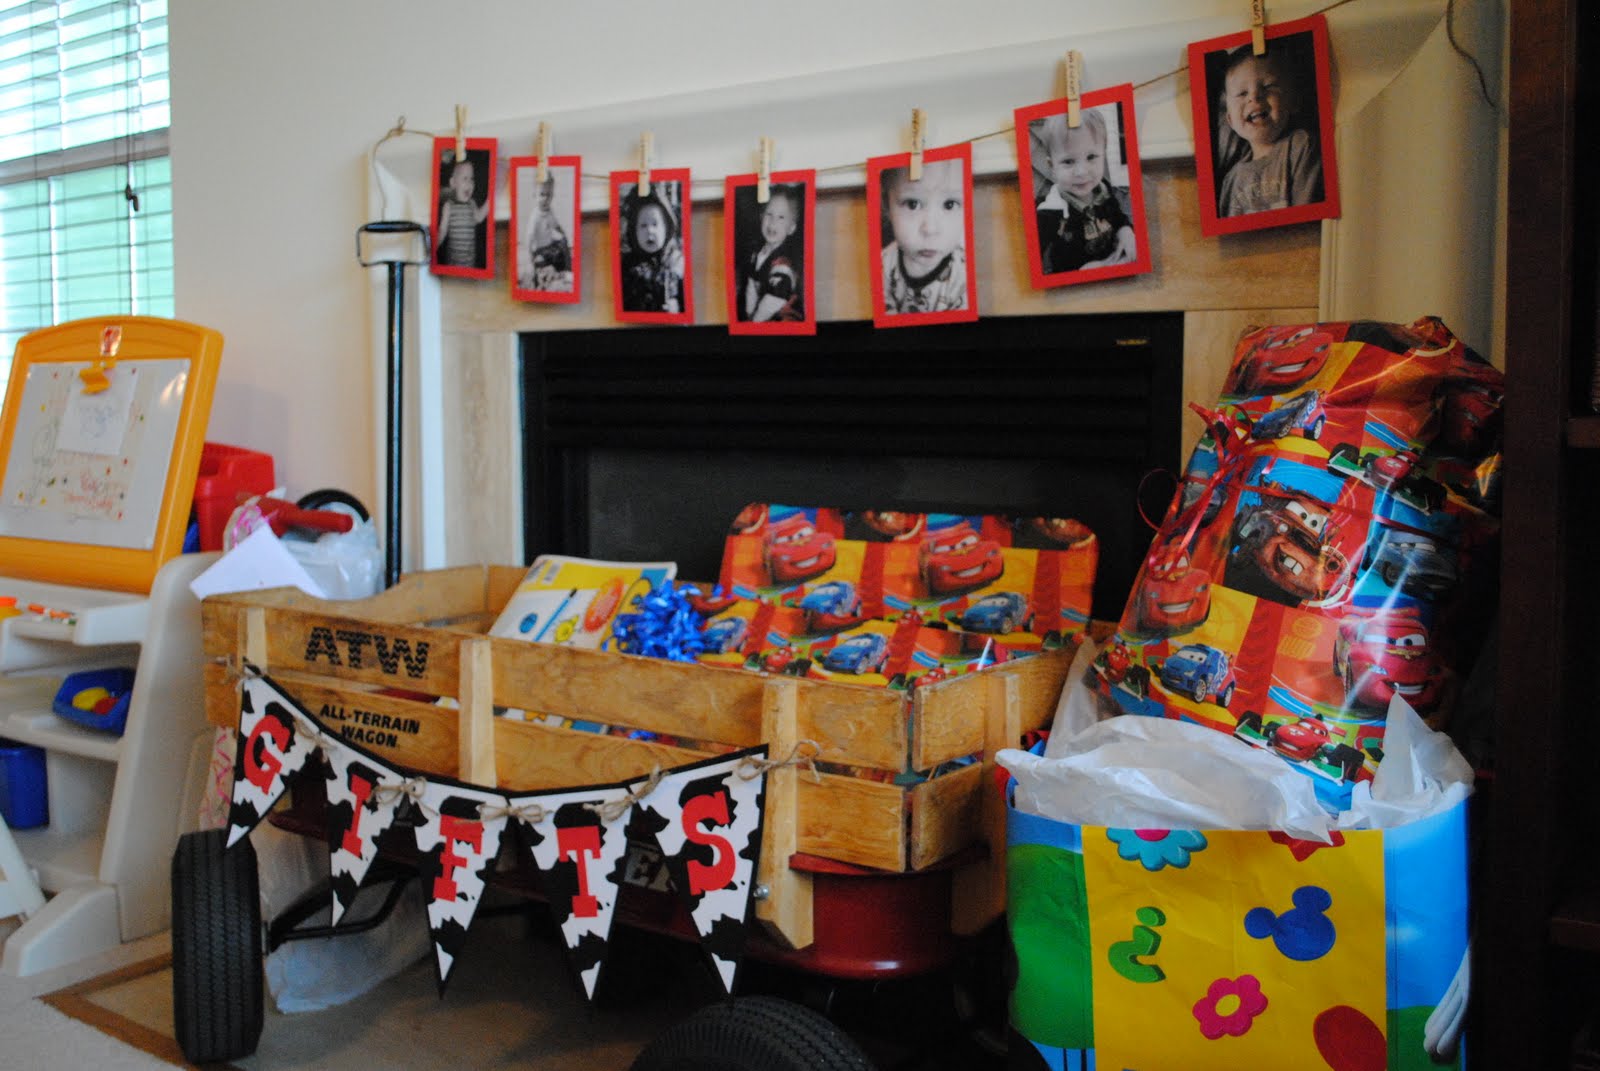
I wrote how old he was in each picture on the clothes pin.
The pictures were of him every other month since his
first birthday (12 mo, 14 mo, 16mo, etc..)


In addition to the cupcake tower, we had Twizzlers, Cow Tales, Skittles,
Kit Kats, Cow Pies & Haystacks


It's not pictured here but my husband was up until 1am smoking
a delicious pork butt for our BBQ feast - it was SOOOOO good!
The rest of the menu included watermelon, macaroni salad,
chips, popcorn chicken & pigs in a blanket.

I found these beautiful sunflowers the day before the party
at my local grocery store on manager's special for a fraction
of their original price - score!!

You can't really tell from this picuture, but the utensils were wrapped in paper
bandana print napkins and I tied a piece of jute twine around the
bundle to secure it all in place.

Our adorable next door neighbor, Lizzie, with an adorable
miniture cow!


The birthday boy!!

I wanted to keep these pigs!
All of the signs pictured (wreath sign, banners, thank you sign, food sign, etc.), I created with my Silhouette.  I can't tell you how much easier that made my life.  If you don't have one, you really need to ask Santa for one this Christmas (btw, I do not get paid any money whatsoever from Silhouette.....I just love their machine to the moon and think every crafter should have one)!

In addition to the animals & food, we did play a few games.  Pin the Tail on the Piggy, a Cow Pie toss (brown bean bags I made from felt), and an egg hunt.  The plastic eggs were borrowed from neighbors and inside each one I put a yellow pom-pom to represent the yolk.  However, one contained birthday confetti and whomever got that one was the winner.  This allowed it to be fair and fun even for the littlest of participants.  Game prizes included egg shaped sidewalk chalk that I got on clearance after Easter, a punch balloon that was in the shape of a bull when blown up and a wooden farm set that you could paint.

I'm not gonna lie, it was a lot of hard work. But I started my planning EARLY and was always on the lookout for things that I could get on sale or super cheap that went with my theme.  By starting early I was able to work on it piece by piece, a little at a time which helped me not to get overwhelmed.

I had a blast planning and creating this party for him and his friends and in turn, they all had a wonderful time.  Win, Win!! 

Now, what to do for next year........ {wink, wink}

Wednesday, June 8, 2011

Summer To-Do List

Thanks to some inspiration from the infinitely talented girls over at eighteen 25, I decided to create my very own Summer To-Do List.


The supplies you'll need:

  • 12" x 36" poster frame
  • paper (I used 3 sheets of 12" x 12" scrapbook paper and 5 coordinating pieces of 8.5" x 11" cardstock)
  • tape
  • gluestick
  • craft sticks
  • exacto knife
  • dry erase marker
I used my Silhouette to cut out the words (pharmacy font) and ice cream shapes and used the glue stick to adhere them to the scrapbook paper.


I then cut down to craft sticks using the exacto knife so that they would fit my design and glued those down as well.


I taped the scrapbook paper together so it was all one long sheet and put it into my frame.  Using the dry erase marker, I jotted down all the activities I'd like for us to do this summer.


Quite an impressive list!  It looks like a lot, but the majority of the activities are small things we always do in the summer (eat watermelon, go to the beach, go to the pool, etc....), so it'll be easy to mark them off.  What a fun way to spend the summer!  It'll be nice to look back at the list once summer is over and see how much we were able to do during the next few months.

Monday, April 11, 2011

Spring Display

Finally, I can show you all the pieces of my spring display.  It's nothing spectacular, but I just love it!!!


The larger picture frame was one that I already had and the smaller one I found in the dollar section at Michael's.  I spray painted both white to go with my theme.  The pedestal for the birds nest is a cake stand that I've turned upside down and the nest itself is reindeer moss that was leftover from a Halloween wreath project and some eggs that I found at Tuesday Morning.

It's clean and classic and simple and makes me smile!

Wednesday, March 16, 2011

Spring Wreath

To go along with my Silhouette vinyl spring candles I made a spring wreath for my dinning room display.


I started by wrapping my wreath form with white yarn.  I was actually able to get the wreath form at Michaels for $1.50 since it was split.  Nothing a little duct tape couldn't fix!!!


Then I made some fabric flowers using an old white sweatshirt that I had worn at an 80's Halloween party a la Flashdance style, some beads from a necklace that was taking up space in my jewlery drawer and this pattern from wise craft


I am not known for my sewing ability, so the flowers had to be simple to make.  These were SUPER easy and turned out beautiful!


I hot glued them to my wreath and used my Silhouette to make the Spring banner.  I strung the banner using some twine and hung the entire wreath from my dinning room mirror using a piece of chocolate brown ribbon.


I couldn't be happier with how this turned out!


Join  us Saturdays at tatertotsandjello.com for the weekend wrap up
    party!

Photobucket

Tip Junkie handmade projects

Tuesday, March 8, 2011

Silhouette Vinyl Spring Candles

I am in the midst of creating a spring display in my dinning room using a color palette of white, blue and brown.  I recently purchased some light blue candles from Walmart to put into two cylinder vases with some coffee beans I found in the freezer (Side note: I got a Keurig this summer for my birthday and LOVE IT! Consequently, I have a lot of coffee beans in my freezer that aren't being used - unless you count this project!).  The candles were just ok, but I wanted to jazz them up a little.  Enter the Silhouette, some white vinyl and VOILA! problem solved. 


They turned out so AH-MAZING! I'm in love with them! Plus, they couldn't have been easier or faster to do (bonus!). Here they are in the vases with the coffee beans:


YAY! Now, on to the next one...........

Tip Junkie handmade projects


Join  us Saturdays at tatertotsandjello.com for the weekend wrap 
 up           party!


Saturday, January 29, 2011

What's black & white & red all over?


My Valentine's decor (and first ever blog post!!!)! 

First things first, WELCOME TO DUCT TAPE & HOT GLUE!!!  I hope you like what you see and come back regularly!! 

Now, about my Valentine decorations. I wanted to keep things simple and inexpensive.  Everything shown I either 1) already had or 2) purchased on sale and/or with a coupon.  The love sign shown above I found in the dollar bin at Target!!  I can't count the number of items I've found in that section of the store.  I always stop and look at what they've got anytime I make a trip to Target (which sometimes feels like once a week especially since those are the brand of diapers that we use).  The candles, ribbon & candle holders shown above were all things that I already had on hand.


I then rummaged around my bookshelf and found two books that had the word "love" in the title.  I removed the paper book covers and {bonus!} found that one book was red and the other was black!  The small, square frame was purchased at Michael's with a 40% off coupon.  I already had the houndstooth scrapbook paper which I used to cover the mat.  Michael's is also where I found the red, glitter heart that's in the frame.  It was in a pack of six (for $1.50!!) and they were actually ornaments.  I cut off the ribbon loop, hot glued it to the middle of the frame and TA-DA!  Cute, right???  The picture is of my wonderful hubs and I sharing a little smooch on our wedding day (have a cavity yet??) ;o)


For my cupid art, I again raided my own closet and found these two black frames (as well as the one I used for our wedding day kiss picture), the damask tissue paper (yes, tissue paper!) and the red & black cardstock.  A quick note on the tissue paper.  I am a notorious neat freak and don't like a lot of clutter which means I typically throw a lot of things away.  Tissue paper & ribbons are one exception.  Any holiday/birthday, I make sure to save the bags, tissue paper & ribbons.  I've lost count of how many times the "scraps" have come in handy for one reason or another.  I used my Silhouette to cut out the cupid shape.  Another side note: the Silhouette was the only thing that I wanted for Christmas this past year and my wonderful mom made sure I was unwrapping it come Christmas morning.  WOO HOO!!  I actually knew I was getting it, so I was able to tell my BIL (who drew my name for Christmas) to get me a gift certificate to their on-line store.  I've been finding every excuse possible to try it out.  Lucky for me, we've got several January birthdays & of course Valentine's Day.  It is an amazing tool to have in your craft kit and I highly recommend purchasing one, if you can.  They regularly have special promotions where you get the machine and several products at a discounted price.  You won't be sorry - I promise!!!


All in all, I was really pleased with how my entry way decor turned out.  I was also very happy that I was able to create this look for a whopping $5!!!  CHA-CHING!  Again, thanks for stopping by and checking me out.  I hope you'll come back!!